| Place |
 |
■Regular classroom □Computer room □Special classroom □Gymnasium
□Athletic Field □Outdoors □Others〔 〕 |
|
|
|
| Type
of Lesson |
|
■Class □Group □Pair/Individual □Follow-up □Others〔 〕 |
|
|
|
| Phase |
|
■Introduction ■Development ■Conclusion □Others〔 〕 |
|
|
|
| Main
user of IT |
|
■Teacher ■Student □Others〔 〕 |
|
|
|
| Objectives |
|
□To introduce the topic □To motivate
students ■As illustrative material used by the teacher ■As illustrative
material used by the student □To master through repetition □To present
a model □To recollect past experiences □To compare □To examine what
has been done/studied □To provide second-hand experience □Others〔 〕 |
|
|
|
| Equipment |
|
■Computer ■Projector □Screen ■Electronic
Whiteboard □Visual Presenter ■Digital Camera □Video Player □Internet □Digital
Contents □CD-ROM □Speakers □Others〔 〕 |
|

| Various presentations using the electronic
whiteboard to project blank maps and visuals obtained during an exploration
of the school district will provide more detailed information of the local
area. |

Information on Our Town
Contents: based on curriculum guidelines
3rd & 4th Grade Contents
(1)
| To encourage students to recognize the differences of
each locale of the surrounding area through observing, researching and
collecting data onto a blank map about the surrounding areas and towns
in terms of the following points. |
| A |
Details such as characteristic landscapes, conditions of
land use, the location and type of public facilities, information on
the traffic and transportation of the local surrounding area. |

| To increase awareness that conditions of the
surrounding area differs depending on the locale, through observing and
researching the landscape and land use of the local area. |

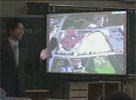
| (1) |
Give an overall view of the school district
by presenting an aerial photo and blank maps of the district.
|
|
|
[Abstract]
The teacher is explaining today’s lesson on the electronic whiteboard. |
| |
| |
|
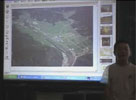
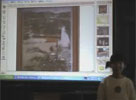
| (2) |
Students working in groups present
the results of their observation of their local areas using a projector
to show photos and maps. They place marks and symbols onto the photos
and maps using the electronic whiteboard for an effective presentation. |
| |
|
| |
| Presentations
using photos on the electronic whiteboard |
|
|
|
|
[Abstract]
Students are presenting their research results with visuals on the electronic whiteboard. |
| |
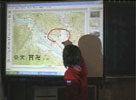
| Presentation
using map symbols |
|
|
|
[Abstract]
The movement of the map symbols allows an easy-to-understand presentation. |
|
| |
|
| (3) |
Discuss the differences of each
area. |
| (4) |
Sum up the overall condition
of the school district |

| (1) |
Make sure that either the teacher or student takes enough photos when
exploring the school district.
|
| (2) |
If roofs or elevated land is not available
for an aerial shot, you may scan an aerial photo of the school for computer
installment in order to project the image onto the screen. Blank maps
are available for reference and editing by downloading a mapping software
“jMappy” found in the NICER site. |
| (3) |
Map symbols were created by the teacher,
using drawing software. (For semi-transparent symbols, save in GIF mode.) |

| (1) |
NICER National Information Center
for Educational Resources
http://www.nicer.go.jp/jmappy/ |
| (2) |
Photo presentation software: SMART Board
Note Book
(comes with the Electronic Board “SMART Board” by SMART Technologies (Japan)
Inc.) |
|